Proper Engine Testing
How do you know that the changes you're making to your engine are beneficial to it's performance? How can you be sure that you've actually improved the strength of your engine? The answer is by thoroughly testing your engine after every change.
This guide aims to explain the process of testing during the development of your engine. We will first look at why testing is important. Next, we'll focus on what kind of tests we should be running and how to interpret the results. After that, we'll see how to run these tests, using a popular framework called OpenBench.
In the end, my hope is that you will not only have a better understanding of how and why to test your engine, but that you will also know how to set up and use OpenBench to serve as your primary testing framework.
Engine Strength Testing
I'll begin with a non-negotiable commandment:
You must thoroughly test every change you make to your engine, regardless of the complexity.
Why? Let's say you have a new engine with only a handful of basic features implemented. You hacked these features together by reading various pages on Wikipedia, the Chess Programming Wiki, Stack Overflow, and other websites until your engine seemed to grow stronger. You then decide to add another feature to your engine, such as a modification to the search algorithm or a tweak to the evaluation function. So you write a few dozen lines of code and call it good. But how can you be sure this feature actually works? For all you know, it could be a total improvement on the few positions you unleashed the new version of your engine on, but fail catastrophically on many other positions, leading to an overall decrease in strength. This could happen because you have a sneaky bug in your implementation, or because the feature you added just doesn't help your engine.
Engines are complicated.
Especially the search.
Every feature you add interacts with the other features of the engine, so it is almost impossible to predict whether a change you made will actually be an improvement without properly testing during you development.
This is particularly true if you have largely copy-and-pasted feature implementations from various websites without fully understanding the logic behind them.
For example, does your search use a "fail soft" or a "fail hard" framework?
Are you properly modifying mate-in-n scores as they bubble up the search stack?
When performing transposition table cutoffs, are you ensuring that you're not in a PV node?
If you don't know the answers to those questions, or if you don't fully understand them, then chances are high that your implementation(s) are bugged. If you don't fix these bugs quickly, they will propagate to other parts of the engine later and your development will get sloppier and more frustrating.
Different Kinds of Tests
This guide is focusing on strength testing, wherein you are trying to determine if the changes you made to your engine have altered its strength (Elo) in a measurable way. This is not the only kind of testing you should be doing during development. You should familiarize yourself with the concepts of unit testing and integration testing (if you want bonus points, look into mutation testing, too). These kinds of tests will help you detect if the implementations of features in your engine are correct, whereas strength testing will only tell you whether or not the feature gains Elo.
You can spend hours researching the proper ways of unit/integration tests, so I will not go into extreme detail here. I will simply say that you should write unit tests for every logical function in your engine, and integration tests for every case wherein these functions interact with each other. If your functions are too complicated and cannot be tested easily, you should refactor your code into more manageable (and testable) components.
I highly encourage you to use the test suites compiled by other engine devs.
Just for fun, here are some issues I have seen arise due to poorly written and untested code:
- Evaluation functions that return mate scores
- Hash collisions causing the engine to play illegal moves
- Engine crashed because it was told to search for a negative amount of time
- Search returned nonsensical values because it timed out and overwrote a valid hash table entry
- I/O being read/written out-of-order
- Integer overflow. Enough said.
Minimum Viable Product
Properly testing your engine involves having the old version of the engine play against the new version, so your engine must be able to play a complete game of chess without crashing or playing illegal moves. If you do not have your move generation working, or if it has not passed a perft suite, you should not proceed to strength testing yet.
The first test that you run should be a "sanity check" of your baseline engine vs itself. This is intended to ensure that your testing framework works before you start testing actual changes to the engine.
For testing with OpenBench, your "baseline engine" should be UCI-compliant, play random legal moves, support being benchmarked1 and must be compilable with a Makefile.
UCI
The Universal Chess Interface (UCI) is the standard communication protocol that chess engines and chess GUIs use. UCI has many specifications, but only a subset of them are required for testing:
go wtime <> btime <> winc <> binc <>
position startpos
position fen <fen>
quit
stop
uci
ucinewgame
isready
The details on how to make your engine UCI-compliant will be specific to your engine and are out of the scope of this guide. Please see the relevant links to UCI documentation for more information.
Random Moves
Your baseline should return a random legal move when asked to search on a position. This should be trivial to implement, assuming you have (well-tested) code in place to generate moves for a given position and check the legality of those moves.
Benchmarking
This is somewhat of a OpenBench-specific requirement, meaning that you do not need this if you intend to use fastchess or cutechess directly.
However, it is highly recommended as it will be a useful aid in development.
A "benchmark" is simply a search on a pre-defined set of positions. It is used to determine if a change to your engine has affected the search in a significant way, as well as serving as a "fingerprint" for each commit you make during development. If the changes you've made to the engine do not cause the benchmark output to change, then the changes are likely to be non-functional. Non-regression tests should be used for testing non-functional changes.
You can get use an existing bench suite from a reputable engine such as Stormphrax, Viridithas, or Stockfish. I would personally recommend including "edge-case" positions in your benchmark suite, such as positions with only 1 legal move available, drawn/checkmated positions, zugzwang positions, etc. as they can help detect non-functional changes for things that can be annoying to debug if implemented improperly.
For OpenBench, your engine must support being benched from the command line:
./YOUR-ENGINE bench
The output must contain the number of nodes search and the nodes-per-second (nps) metric:
8763483 nodes / 3.426305007s := 2557706 nps
Makefile
This is another OpenBench-specific requirement.
OpenBench will build your engine by running make EXE=<ENGINE_NAME>-<commit hash>, so your engine must support being built via Makefile.
Below is an example Makefile for an engine written in Rust.
Change the compilation commands to whatever compiler your engine uses.
ifndef EXE
	EXE := YOUR-ENGINE
endif

openbench:
	@echo Compiling $(EXE) for OpenBench
	cargo rustc --release --bin YOUR-ENGINE -- -C target-cpu=native --emit link=$(EXE)
For the baseline engine, you can just hardcode the bench command to display a fixed number for the nodes and nps values. You will need to change this once you implement a real search, however.
Sequential Probability Ratio Test
The state-of-the-art method of testing an engine's strength during development is through a Sequential Probability Ratio Test, or SPRT. SPRT is a statistical method of sequential hypothesis testing, so a basic understanding of statistics (hypothesis testing, confidence intervals, etc.) is recommended.
In short, "running SPRT" involves having the old version of the engine play against the new version until you can confidently conclude (within margin of error) whether the performance has changed (as defined by the null/alternative hypotheses).
This guide will go over the basics of how to run SPRT and interpret the results. I am not a statistician, so I will gloss over the theory behind the math. There are various links within this section (and more at the end) that you can click on for further reading, if you are interested in learning more.
The Basics
SPRT requires that you specify two hypotheses about the Elo differences between the two engines you are testing:
H0: The elo difference iselo0.H1: The elo difference iselo1.
SPRT then tries to test which one of the hypotheses is more likely1. This is a statistical method, so you must specify a confidence threshold for your comfort level for getting a false positive/negative.
The numerical parameters you must provide are:
elo0- Elo difference for the null hypothesis (H0)elo1- Elo difference for the alternative hypothesis (H1)alpha- Confidence threshold for false positivesbeta- Confidence threshold for false negatives
Gainer Bounds
If elo0 + elo1 >= 0, then you are testing with "gainer" bounds.
You will use gainer bounds when testing a change that you expect to improve the strength of your engine (such as adding a new search feature).
Common values for gainer bounds are:
[0.0, 10.0]for weaker engines (<2500 Elo), or for implementing features that are expected to gain large amounts of Elo (such as MVV-LVA)[0.0, 5.0]for stronger engines or for features that may not gain significantly.
In general, gainer bounds have elo0 := 0, and elo1 is smaller if the expected gain is also smaller.
Non-Regression Bounds
If elo0 + elo1 < 0, then you are testing with "non-regression" bounds.
You will use non-regression bounds when testing a change to ensure that it does not cause the engine to lose (too much) Elo (such as refactoring, or "non-functional" changes).
Common values for non-regression bounds are:
[-10.0, 0.0]for weaker engines (<2500 Elo).[-5.0, 0.0]for stronger engines.
In general, non-regression bounds have elo1 := 0.
Note: SPRT does not tell you the exact Elo difference between two engines. It merely provides a likelihood that the Elo difference is closer to elo0 or closer to elo1.
Interpreting Results
At a basic level, the only numerical value you should be concerned with is the one labelled LLR.
LLR stands for Log Likelihood Ratio, and, in short, states which of hypotheses to accept.
This number will update regularly as the SPRT continues and more data is collected, and will eventually reach either the negative or positive bound.
With a standard 95% confidence threshold, the LLR bounds will be (-2.94, 2.94).
A positive LLR means that our alternative hypothesis (H1) is more likely to be true than our null hypothesis (H0).
A negative LLR means that our null hypothesis (H0) is more likely to be true than our alternative hypothesis (H1).
In general, you will most often want tests to conclude with a positive LLR.
OpenBench will color the test results according to the test type and the results:
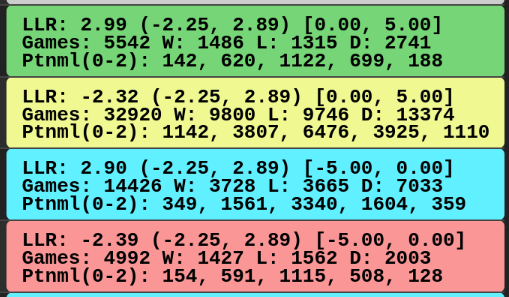
| Color | Meaning |
|---|---|
| Green | Passed with gainer bounds |
| Blue | Passed with non-regression bounds |
| Red | Failed |
| Yellow 2 | Failed, but W >= L |
If a test "fails yellow" then you should use caution when determining whether to integrate those changes. If W/L is significantly large, then you may want to re-run the test with tighter bounds.
Examples
Here we have an example OpenBench output for a completed SPRT:
Elo   | 13.87 +- 7.58 (95%)
SPRT  | 8.0+0.08s Threads=1 Hash=16MB
LLR   | 2.90 (-2.25, 2.89) [0.00, 5.00]
Games | N: 4186 W: 1197 L: 1030 D: 1959
Penta | [130, 455, 782, 570, 156]
In short: This gainer test passed, concluding that the changes being tested are an improvement for the engine.
Explanation
Elo | 13.87 +- 7.58 (95%)
The estimated Elo difference between the two engines being tested is between [6.29, 21.45], and the test was ran with a 95% confidence threshold.
These values should not be trusted for accuracy, as they are only estimates, and Elo ratings are dependant on the sample space.
In the X +- Y format, X is the estimated Elo difference and Y is the error margin.
In general, if X > Y, you can assume (within the confidence threshold) that the result is sound and that there is a measurable Elo difference between the engines.
If X <= Y, you must collect more samples ("small sample size" or "sss") by letting the test continue to run.
SPRT | 8.0+0.08s Threads=1 Hash=16MB
This test was ran at a time control of 8.0 seconds per side with a 0.08 second increment per move.
Each engine was told to search in single-threaded mode with a 16mb hash table.
LLR | 2.90 (-2.25, 2.89) [0.00, 5.00]
The bounds of this test were elo0 := 0.00, elo1 := 5.00, meaning this was a "gainer" test, and the changes being tested were expected to improve the strength of the engine.
LLR := 2.90, meaning that H1 was accepted.
Games | N: 4186 W: 1197 L: 1030 D: 1959
4186 games were played, with the "new" engine winning 1197, losing 1030, and drawing 1959.
Penta | [130, 455, 782, 570, 156]
Games are ran in pairs, so each engine plays once as White and once as Black.
So, within a "game pair" you can either gain 0, 1/2, 1, 3/2, or 2 points.
In this case, the NEW engine:
- Scored
0points (lost as both sides on a game pair)130times - Scored
1/2points (lost and drew on a game pair)455times - Scored
1point (either won and lost or drew twice on a game pair)782times - Scored
3/2points (won and drew on a game pair)570times - Scored
2points (won as both sides on a game pair)156times
Software for Running SPRTs
As stated in the introduction, this guide will focus on using OpenBench as our testing framework, as it offers significant advantages (such as distributed testing) over a basic command-line tool. We will look at how to set up and use OpenBench in a later section, as it is much more lengthy than downloading and running an executable.
However, if you want an alternative approach (that does not require as much setup), you may consider fastchess or cutechess.
These are command-line tools that you can use to run SPRTs locally.
The exact command you need to run will vary depending on the software you are using, as well as other factors like test bounds, opening books, etc.
See the relevant documentation for the software you choose to use.
Here is an example of running an SPRT with fastchess:
fast-chess -engine cmd=[Path to NEW ENGINE] name=engine_NEW -engine cmd=[Path to OLD ENGINE] name=engine_OLD -each tc=8+0.08 -rounds 15000 -repeat -concurrency [Number of Available Threads] -recover -randomseed -openings file=[Path to Opening Book] format=[Opening book format (pgn or epd)] -sprt elo0=0 elo1=5 alpha=0.05 beta=0.05
And here is an example of running an SPRT with cutechess-cli:
cutechess-cli -repeat -recover -variant standard -concurrency 10 -games 640 -resign movecount=3 score=400 -engine dir=Engines/ cmd=./engine_NEW proto=uci tc=8.71+0.09 timemargin=250 option.Threads=1 option.Hash=16 name=Engine-NEW -engine dir=Engines/ cmd=./engine_OLD proto=uci tc=8.71+0.09 timemargin=250 option.Threads=1 option.Hash=16 name=Engine-OLD -openings file=Books/UHO_Lichess_4852_v1.epd format=epd order=random start=19777 -srand 944
OpenBench
OpenBench is a distributed chess engine testing framework.
It is more complex than fastchess and cutechess because it handles more than just running the SPRTs.
While this may seem like overkill, the extra features of OpenBench are incredibly useful and you will be glad to be able to make use of them.
OpenBench has a wiki that will contain more detailed information than what I will cover here. I intend to cover the basics on how to set up OB, configure your engine, connect workers, and run SPRTs. You should refer to that wiki if you have additional questions.
Additionally, we will be setting up OpenBench through a service called PythonAnywhere.
PA is a good choice for hosting the server as it is free, allows you to keep your OpenBench instance running 24/7, and makes it easy for people outside of your network to see your tests and connect new workers.
Using PA also saves a lot of trouble when dealing with anaconda and other python-related tools on your own hardware.
Many people use OpenBench collaboratively. In a shared instance, people tend to leave their worker(s) connected 24/7, executing workloads for any tests that get created. Sharing an instance allows you to share resources and (hopefully) have everyone's tests finish faster.
If you are interested in sharing your instance or joining an existing shared instance, ask around, such as in the OpenBench Discord Server.
Overview
OpenBench is a two-part piece of software. The server provides a UI for creating and viewing tests, as well as other features such as account management. The client is ran on a "worker" machine and is what actually runs the SPRT in batched workloads. Multiple clients can connect to the server, meaning you can amass a chess-playing botnet to speed up your tests (assuming you have a few old laptops laying around, or a GCP account).
If this is your first time setting up OpenBench and running SPRTs, the computer you are using right now will likely be the first worker you connect to your server.
Setup
As stated before, there already exists a wiki containing much of this information, so refer to that if you get stuck.
Repository Setup
First, we're going to set up your copy of an OpenBench repository.
- Fork the original OpenBench repository, hosted by AndyGrant.
- All modifications you make will be done to your fork of OpenBench.
- In
OpenBench/Config/config.json:- Replace the value of
client_repo_urlwith the URL to your fork of OpenBench.- Failing to do this will cause your OB instance to break unexpectedly.
- Add the name of your engine to the
engineslist
- Replace the value of
- In
OpenBench/Engines, create a config file for your engine:- Copy an existing config file
- Update the value of the
sourcefield to point to the GitHub repository containing your engine.- Only GitHub repositories are supported. If you are hosting your engine on another platform, consider making a mirror.
- Update the value of the
npsfield to be the value outputted by your engine'sbenchcommand.- You will likely need to update this in the future- especially if your engine is the aforementioned random-mover baseline.
- Update the
buildsection to be appropriate for your engine.- For most people, this will just involve changing the
compilersvalue to include whatever compiler(s) your engine needs (i.e.cargo>=1.83). - Look at other engine config files for references on how to include your engine's dependencies.
- For most people, this will just involve changing the
- (Optional) Change the default test bounds for your engine to be
[0.0, 10.0]. - (Optional) Remove the adjudication presets (set them to
None), only adding them back once your engine is 1200+ Elo.
PythonAnywhere Configuration
Next, we're going to start the OpenBench server through PythonAnywhere.
- Register a new account on PythonAnywhere and navigate to the "Dashboard" screen.
- Navigate to the "Consoles" tab, create a new Bash console, and enter the following commands:
git clone https://github.com/<YOUR GITHUB USERNAME>/OpenBench cd OpenBench pip3 install -r requirements.txt python3 manage.py makemigrations OpenBench python3 manage.py migrate python3 manage.py createsuperuser - Back at the PythonAnywhere dashboard, navigate to the "Web" tab
- Click "Add a new web app"
- Choose a name (a common pattern is
<YOUR USERNAME>.pythonanywhere.com) - Click "Manual configuration (including virtualenvs)" and choose
Python 3.10 - Let it load, then scroll down to the "Code" section.
- For the
Source codesection, enter the URL to your OpenBench fork (https://github.com/<YOUR GITHUB USERNAME>/OpenBench). - Click on the value for
WSGI configuration file. - Scroll down until you see a section title
DJANGO, around line 74. - Delete everything else in this file, leaving only the
DJANGOsection, and uncomment it. - Update the
pathvalue so that it points to your OpenBench fork. - Replace
mysite.settingswithOpenSite.settings. - In the end, the file should contain only the following:
# +++++++++++ DJANGO +++++++++++ # To use your own django app use code like this: import os import sys # assuming your django settings file is at '/home/<YOUR USERNAME>/mysite/mysite/settings.py' # and your manage.py is is at '/home/<YOUR USERNAME>/mysite/manage.py' path = '/home/<YOUR GITHUB USERNAME>/OpenBench' if path not in sys.path: sys.path.append(path) os.environ['DJANGO_SETTINGS_MODULE'] = 'OpenSite.settings' # then: from django.core.wsgi import get_wsgi_application application = get_wsgi_application()- Save the file.
Instance Configuration
Now we can log into the server and set up your account.
- Navigate back to the "Web" tab and click the green "Reload" button.
- You should now be able to navigate to
<YOUR USERNAME>.pythonanywhere.comand see OpenBench running. - On your OpenBench instance, click "Register" on the left sidebar and create an account.
- This will be your user account, not the administrative account.
- After creating, you should see
Account has not been enabled. Contact an Administrator.
- Go to the administration page for your OpenBench instance, located at
<YOUR USERNAME>.pythonanywhere.com/admin.- Under the "Authentication and Authorization" list, click "Users"
- Click on the username of the account you just created, not the
adminaccount. - Under "Permissions", check the boxes labeled
Staff StatusandSuperuser status- If other people join your OB instance in the future, you do not need to mark them as Staff/Superusers
- Also under "Permissions", (specifically "Available user permissions"), select all permissions that start with
OpenBench(likeOpenBench | engine | Can change engine) and add them to your user.
- Click on the username of the account you just created, not the
- Save your changes and navigate to the "Profiles" tab, on the left sidebar, under the "OpenBench" list .
- Check the boxes labeled
EnabledandApprover. - (Optional) Add the name/URL for your engine in the "Repos" field, and your engine's name in the "Engine" field.
- Check the boxes labeled
- Under the "Authentication and Authorization" list, click "Users"
- Navigate back to your OpenBench instance (not the
/adminpanel) and sign out. - Sign in with the non-admin account (the one whose permissions you just updated).
- You should now be able to create a new test by clicking the "+ Create Test" button on the left sidebar, underneath the "Actions" section.
- Ensure that you can select your engine from the drop-down menus for
Dev EngineandBase Engine, and that the respectivesourcefields point to your engine's GitHub repository. - Refer to the wiki page for creating tests for explanations on the all of the individual fields.
- For now, fill in the
Dev/Base Branchfields with the name of the branch you wish to test (probablymain, for both, since you're going to be testing the random mover against itself). - Fill in the
Dev/Base Benchfields with thenodesvalue outputted from your engine'sbenchcommand. - (Optional) Under "Test Settings", set
Boundsto[-10.0, 0.0]so this test runs as a non-regression test. - Click
Create Engine Testat the bottom of the page.
- Ensure that you can select your engine from the drop-down menus for
You should be redirected back to the index, and should see your test appear on the list of active tests.
Connecting a Worker
You now need to connect a worker to your instance so that the test can be ran.
As stated before, your first worker will probably be the machine you're using right now, but the steps for setting up a worker are the same for additional machines you connect later.
- Ensure that the worker machine has the appropriate compilers necessary to run the engine(s) on your instance.
- Here is a generic command for Ubuntu to install compilers for C/C++/Rust engines:
sudo apt-get update && sudo apt-get install git python3 pip make g++ gcc cargo cmake -y - Clone your fork of OpenBench:
git clone https://github.com/<YOUR GITHUB USERNAME>/OpenBench - Navigate to the
OpenBench/Clientdirectory and install the packages required to run a worker:cd OpenBench/Client pip install -r requirements.txt - Run the following command to connect the current machine to your OpenBench instance as a worker, replacing the username, password, and URLs appropriately:
python3 client.py -U <YOUR USERNAME> -P <YOUR PASSWORD> -S http://<YOUR USERNAME>.pythonanywhere.com -T $(nproc) -I $(uname -n) -N 1- If you do not have
nprocorunameon your system, substitute them as follows:- Replace `$(nproc) with the number of cores/threads on your system. If this machine needs to do other things besides play chess 24/7, consider using one or two fewer than the number of cores on your machine.
- Replace
$(uname -n)with the name you want this worker to have, visible on the/machines/page for your OB instance. You can also omit this (including the-I) entirely, if you don't care about your workers having names.
- If you do not have
Give it a moment to process everything and you should see an output similar to the following:
Looking for Make... [v4.3]
Looking for Syzygy... [0-Man]

Scanning for Compilers...
4ku              | g++      (11.4.0)
BlackMarlin      | cargo    (1.83.0)
BoyChesser       | Missing ['dotnet>=7.0.0']
ByteKnight       | cargo    (1.83.0)
Dog              | clang++-14 (14.0.0)
Ethereal         | clang    (14.0.0)
FabChess         | cargo    (1.83.0)
Igel             | g++      (11.4.0)
Obsidian         | gcc      (11.4.0)
Pawnocchio       | zig      (0.13.0)
Polaris          | clang++  (14.0.0)
Stash            | gcc      (11.4.0)
Stockfish        | g++      (11.4.0)
Stormphrax       | clang++  (14.0.0)
Tantabus         | cargo    (1.83.0)
Toad             | cargo    (1.83.0)
Viridithas       | cargo    (1.83.0)
Yukari           | Missing ['cargo>=1.82.0-nightly']
bannou           | zig      (0.13.0)
ice4             | g++      (11.4.0)

Scanning for Private Tokens...

Scanning for CPU Flags...
Found   | POPCNT BMI2 SSSE3 SSE41 SSE42 SSE4A AVX AVX2 FMA
Missing | AVX512VNNI AVX512BW AVX512DQ AVX512F

Requesting Workload from Server...
Workload [Pawnocchio] debug vs [Pawnocchio] debug
The Workload [ENGINE] vs [ENGINE] line indicates that this worker has received a workload from the server and it will begin executing it.
Navigate back to your OpenBench instance (https://<YOUR USERNAME>.pythonanywhere.com) and you should see something like Active : 1 Machines / 12 Threads / 15.2 MNPS at the top.
Refresh the page periodically and you should see the test results being updated.
Determining Engine Strength
The Computer Chess Rating Lists (CCRL) is a website dedicated to testing and rating chess engines. Engines, just like humans have their strength based in the Elo rating system.
If you want to determine how strong your engine is, you must test it against an engine with a known strength. Within the chess programming community, the engine Stash is a popular choice for this task. Stash has a well-documented development history with plenty of releases that range from 1000 Elo to 3300 Elo and beyond1:
Blitz Rating (* Not ranked by CCRL, only estimates)

v36     3399
v35     3358
v34     3328
v33     3286
v32     3252
v31     3220
v30     3166
v29     3137
v28     3092
v27     3057
v26     3000*
v25     2937
v24     2880*
v23     2830*
v22     2770*
v21     2714
v20     2509
v19     2473
v18     2390*
v17     2298
v16     2220*
v15     2140*
v14     2060
v13     1972
v12     1886
v11     1690
v10     1620*
v9      1275
v8      1090*
So, to find your engine's strength, just pick a version of Stash, download and compile it, bench it, and queue up a test between your engine and that version of Stash.
Rather than run an SPRT, just run a fixed-games test of 1000-5000, depending on how accurate of an Elo estimate you want.
Example
Consider the following test of Yukari vs Stash v30.0:
Elo   | 20.82 +- 9.90 (95%)
Conf  | 8.0+0.08s Threads=1 Hash=16MB
Games | N: 3008 W: 1175 L: 995 D: 838
Penta | [128, 285, 565, 331, 195]
After 3000 games, Yukari was an estimated ~10-~30 Elo stronger than Stash v30.0. Since v30.0 has a CCRL Blitz rating of 3130, it can be concluded that Yukari's strength is somewhere around ~3140 Elo.
See this message in the Stockfish Discord server for exact ratings.
Conclusion
It is my hope that you now have a better understanding of engine strength testing, and that you now have a method of performing this testing process consistently.
I'll leave you with some additional resources that may be of interest to you.
Happy coding!
Additional Resources
- SPRT Testing, Rustic Chess Engine
- SPRT, Chess Programming Wiki
- SPRT, Wikipedia
- SPRT Calculator
- Elo Difference Calculator
- OpenBench on PythonAnywhere
Acknowledgements
Special thanks to the members of various Discord servers in the chess programming community for offering feedback and suggestions for improving this guide.